
How to grow Swiss chard in your kitchen

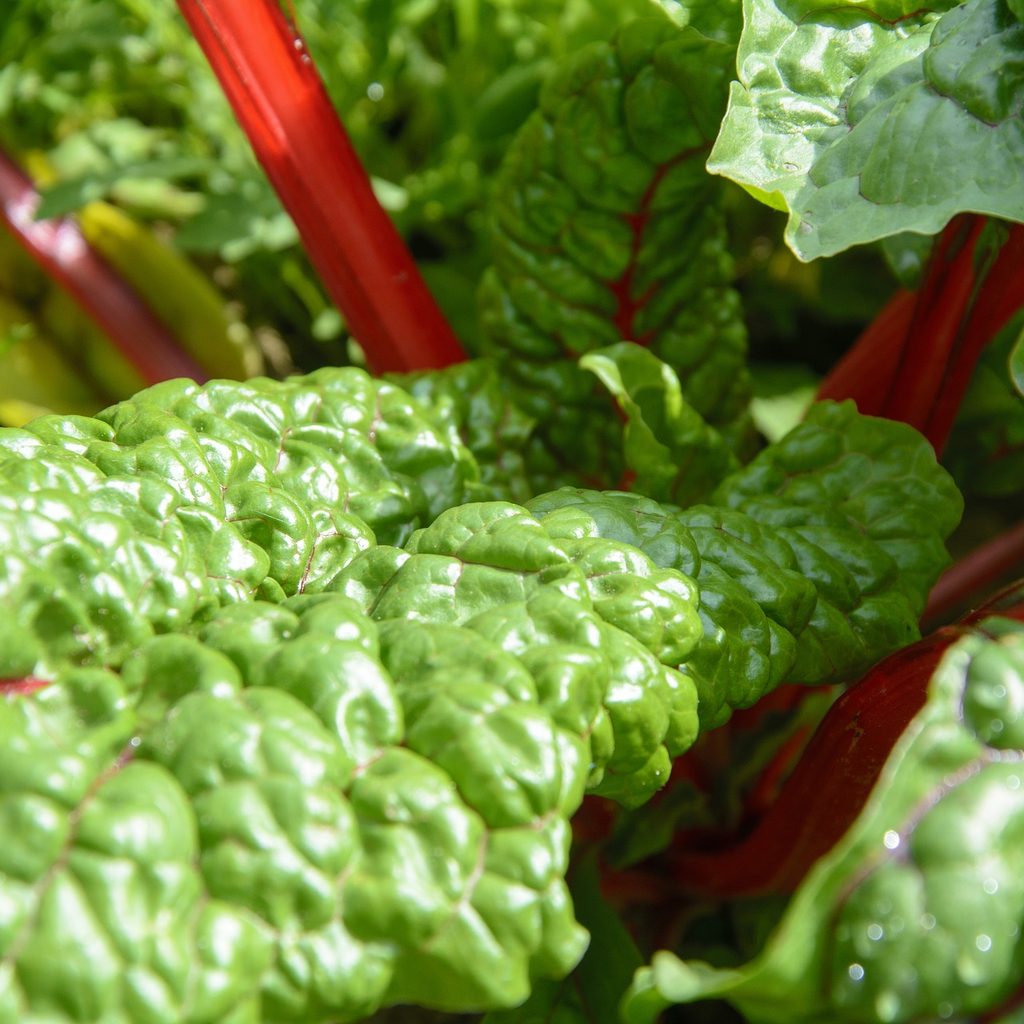
The leaves of a Swiss chard plant are fabulously beautiful with their dark green color and brightly colored center veins. Not only are they pretty, but they’re incredibly good for you as well! Those of us with limited growing space do have to make hard choices about what we can grow, but Swiss chard is a great option for those of us looking to grow produce that’s both nutritious and beautiful.

rainbow swiss chard
Image used with permission by copyright holder

Swiss chard care

Before we get into how you can grow delicious Swiss chard right in your kitchen, let’s first go over the things a Swiss chard plant needs to grow. This will help you eliminate spaces in your home where it won’t thrive and select a location and care routine to allow these colorful greens to flourish.

Recommended Videos

One of the most essential aspects of Swiss chard care is the amount of sunlight they need. This plant needs almost full sun all day long, and providing direct sunlight to an indoor plant all day can be difficult. That’s why we suggest placing it in the sunniest place in your home and supplementing shady hours with a grow light. While some grow lights aren’t too aesthetically pleasing, there are a few that can double as decor while still aiding your plant. If you don’t have a spot in your home with full sun, you can use a grow light as the plant’s sole light source, just be sure to put the plant under the grow light for at least six hours a day.

Swiss chard prefers its soil to be a bit on the acidic side of the pH scale. When you’re preparing your pot, be sure to mix in a balanced fertilizer so the plant will have plenty of nutrients. You’ll also want the soil to be well-draining; the plant roots might rot if the soil doesn’t drain well enough, and all those yummy leaves will be dead before you can enjoy them.

Although Swiss chard doesn’t need a deep container, since its roots don’t grow deep, it still needs plenty of space, so be sure to choose a container that’s at least 12 inches wide. Only one plant should be grown in a 12 inch pot. A 5 gallon bucket is a great option, but be sure you drill drainage holes into the bottom of it.

Once your Swiss chard is fully established, water when the soil dries out most of the way. You don’t have to worry about reapplying fertilizer unless you see signs of stress or lack of food from the plant.

growing swiss chard indoors
Image used with permission by copyright holder

How to plant Swiss chard indoors

Before you get all your supplies out, you’ll want to bring out your Swiss chard seeds and soak them in water for 24 hours before you plant them. This speeds up the germination process and will increase the likelihood of a successful planting. Once they’ve been soaking for 24 hours, you can get everything else ready.

Take your growing container and fill it with the well-draining soil you’ve chosen. Then, add the balanced fertilizer. Use a sieve or fine strainer and gather your soaked seeds. Plant the seeds half an inch deep, and don’t be afraid to put two in one spot, just in case one doesn’t germinate. Wet the soil enough so that it’s damp, but water isn’t running out the bottom.

Place the now-planted containers in their designated spot and set up your grow light station if needed. After about five days, you should start seeing little sprouts poking out of the soil. Wait a few weeks and see if you have more than one plant per hole. If you do, you can select the smaller plant and cut it at the soil to ensure the bigger plant has plenty of resources.

Once the plant is big and mature, you can begin to harvest the outer leaves as it grows. Leave the inner leaves to keep growing and maturing, and you’ll have fresh Swiss chard in your kitchen all season long!

Rebecca Wolken
Former Digital Trends Contributor
Rebecca's has written for Bob Villa and a Cincinnati based remodeling company. When she's not writing about home remodeling…
Indoor gardening: Hydroponics growing tips for any plant
Start your hydroponic garden with these tips
Cilantro grown hydroponically

Hydroponic gardening is a unique and interesting process. Hydroponic gardening is a great way to extend your growing season by growing fruits and vegetables indoors. It flips the script on so much of what's considered traditional or standard about gardening, and having a hydroponic garden is an immediate conversation starter. It looks impressive, but that also means it can be intimidating to start. That's why we're here to help. This guide on how to start a hydroponic garden will help you get started with setting your system up and caring for your plants.
Planning

The first step is to choose your plants and the type of system you want to use. Certain plants have an easier time growing hydroponically than others, so take your time deciding. Some simple ones to start with are spider plants, pothos, mint, and lettuce, but those are by no means the only good ones to start with! Don't forget to measure out how much space you have, as that will impact the size and potentially the type of system you get.

Read more
How big do Bromeliads get?
Caring for you bromeliad so it grows as big and old as possible
Group of mature bromeliads

Bromeliads are gorgeous houseplant that are known for their vibrant flowers and glossy leaves. When getting a bromeliad for the first time, many people find themselves asking a few questions. How big do bromeliads get? What’s the average bromeliad size? How long do bromeliads live? These flowering houseplants are slow-growing, and most of the time when you buy them from the nursery they’re already blooming. That means they’re fully mature and as big as they’re going to get. However, if you want to try propagating your own bromeliad, then you'll need to know what to expect.
How large will your bromeliad grow?

Throughout their life, houseplant bromeliads can grow anywhere from 1 inch to 3 feet tall. Some won’t reach the biggest height by maturity, but some will. It’s a toss-up when you’re growing pups for how big they will eventually get, but you should plan for a 2 to 3-foot-tall plant to be on the safe side.

Read more
How to dry gourds: Your complete guide
Dry your own gourds at home for gorgeous fall decor
A basket with fall leaves and small gourds

Gourds, especially pumpkins and squash, make excellent decorations due to their thick shell-like skins. You can carve them into lanterns, turn them into instruments, or simply paint them to match whatever occasion you choose. Unless you’re carving them, though, it’s best to dry them first. Drying helps preserve the gourd and stop it from decaying. Want to learn how to dry gourds at home? It’s surprisingly simple, even for people without much experience. To help you get started, here’s our easy walkthrough explaining how to dry gourds at home.
Choosing the best gourds for drying

The gourd you choose to dry should be fully mature, so their skins are properly hard. Before they mature, gourds have softer skins, which can interfere with the drying process. Smaller gourds will dry faster than larger ones overall, and while larger gourds can dry at home, they are more time consuming.

Read more