
How to build an outdoor shower enclosure

Spring is here, and summer is right around the corner. There is still time to do some DIY projects and build something that can greatly enhance your outdoor life — like an outdoor shower. It may seem like a luxury, but outdoor showers can be fairly inexpensive to build if you stick with cold water, which will feel great in the hot summer sun!

If you’re an avid runner, swimmer, gardener, or anyone who enjoys breaking a sweat in the summer, an outdoor shower can improve your life dramatically. A simple shower can cost you less than $1,000, and we’re going to show you how to build one step by step.

Outdoor shower made from wood
Papin Lab

How to build an outdoor shower enclosure

Plan the shower drainage

First things first, check with your local regulations to make sure you can build an outdoor shower. Some communities require you to install a drain that connects to your home’s waste system, which needs to be done first. The base will also need to have a drain strainer and be sloped so water flows into the drain. If this is required, a concrete base is your best bet; it will be easy to mold and will last a long time. You can even tile the concrete base if you want to go the extra mile.

Recommended Videos

If you don’t need to regulate water runoff, then the easiest thing to do is allow the water to flow into a garden.

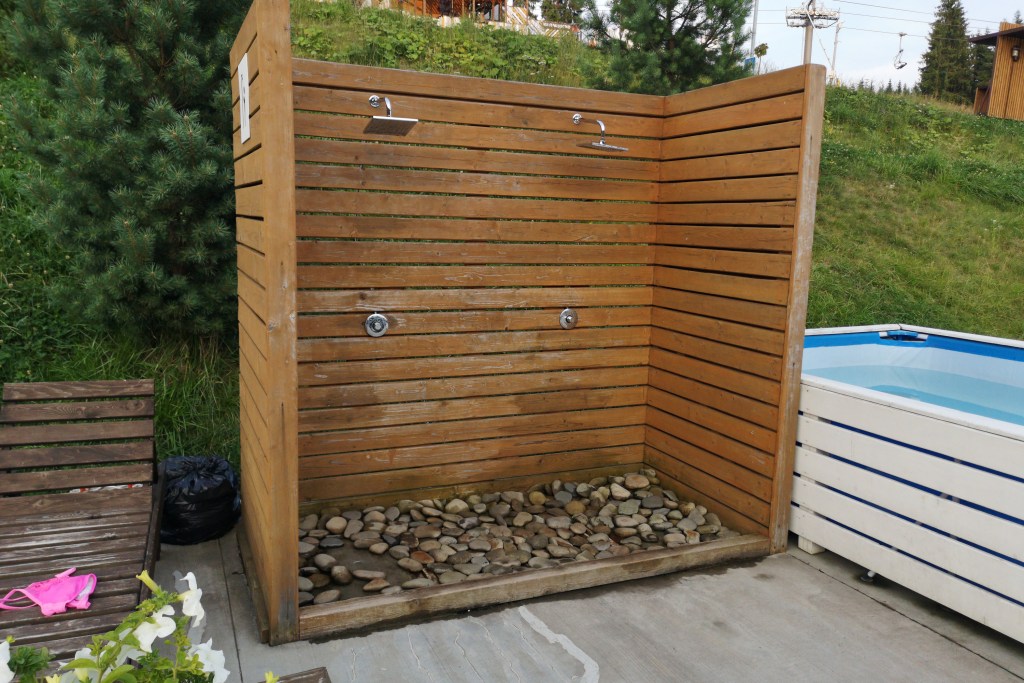
Construct a shower base

Unless you are lucky enough to have a flat piece of ground that drains well or you have a deck, you will need to construct a shower base. A flat, stable base is required for functionality and safety. The dimensions should be, at a minimum, 30×30 inches because this is the most common floor space required by code; however, it is usually a good idea to make it bigger.

As we said before, create the base from concrete or another nonporous material if your shower needs a drain. If no drain is needed, then you have two options that allow water to soak into the ground: cement pavers or wood decking. In addition, some freestanding shower kits are available with a platform so you can skip this step and save some time.
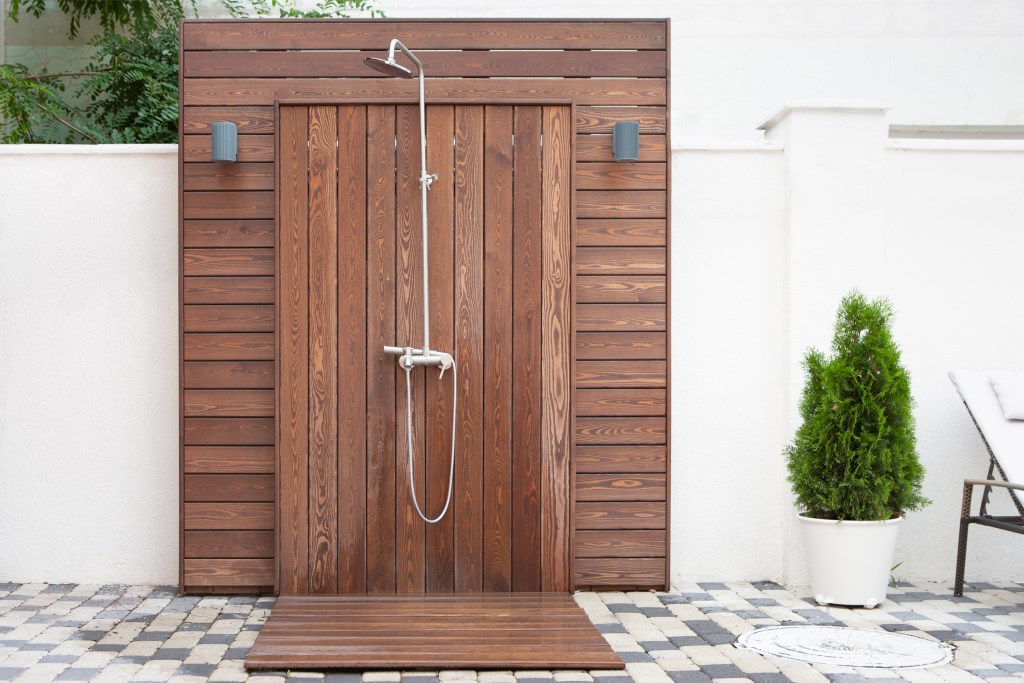
Build the enclosure

If you want to enclose your shower for privacy, now is the best time to create it, specifically the back wall where you will mount the showerhead and valve. Construct the back wall out of wood, vinyl, or any material that is strong enough to support a showerhead and heating unit if you are going with hot water. Alternatively, if you are building your shower next to a  fence or similar structure, you can simply mount the shower head on an existing fence post.

The enclosure is really where your creativity can shine. Enclosures can be made with almost anything, as long as you use a waterproof sealer, including bamboo, corrugated metal, sliding door, or simply a curtain.

Install the shower head and valve

This step will be the easiest or hardest, depending on whether you’re using a freestanding shower. If you are, then all you have to do is position it wherever you want. Stabilize it by pounding a 6-foot metal stake or rebar at least a couple of feet into the ground, then tie the shower riser to it.

If you are using a propane shower instead, which usually comes equipped with a handheld showerhead, make sure to mount it high enough so you can stand underneath it when the handheld showerhead is not in use. Remember to create a place for the propane tank. When installing an outdoor shower valve and head, secure everything to the wall with copper pipe clamps.

Hook up the water

Finally, you are ready to hook up the most essential part: the water. When installing a freestanding shower — solar or propane — all you need to do is take a garden hose and screw it into a hose bib. Turn the water on and leave it to control water flow from the shower. If you went with a solar shower, then the heating reservoir needs to remain in complete sunlight for a few hours before the water will be warm enough to use.

Double showerhead outdoor shower
Ozymandian/Shutterstock

Protect your shower in the winter

Not many people remember this, but your outdoor shower will be exposed to the winter months when not in use. This means you will need to protect it from cold temperatures, depending on your location. The most important thing to do is make sure your shower is completely drained of water to prevent freezing and cracking to the supply hoses and shower fixtures. If you bought a freestanding shower, things are easy for you. Simply remove the garden hose and put away the shower for the winter.

If your shower valve is installed on the wall and connected to a heater, turn off the water supply, put away the hose, and open the shower valves and leave them open. Also, make sure to remove the showerhead and valve from the faucet so that any residual moisture can escape.

The actual shower enclosure will also need to be protected during the winter. When you are ready to close the shower for the season, thoroughly dry the inside and cover the enclosure with a tarp, making sure the tarp is tied securely. If you did not build an enclosure, then cover the shower pipes.

Final thoughts

Outdoor showers may have seemed like a luxury for the wealthy, but anyone can create their own unique shower to enjoy during the summer. Whether you go with a simple freestanding shower with only cold water or go all out with a bamboo enclosure and propane heater, building one only requires some planning, patience, and the willingness to learn.

Niko Vercelletto
Former Digital Trends Contributor
Niko Vercelletto lives in Lansing, Michigan. He is passionate about going into depressive spirals thanks to the Detroit Lions…
When and how to transplant tomato plants for the best results
baby tomato plants

There's a time in every gardener's life when they try to grow their own veggie plants from seed. This is a gratifying process, and there are many benefits to growing your own seed starts. One of those benefits is bigger and healthier plants. By growing your own baby tomato plants, you can ensure that the plants are well cared for, never given anything you don't want them to have, and transplanted in just the right way at just the right time for optimal plant health. So how do you transplant tomato plants to ensure they're happy and healthy and live to produce lots of yummy tomatoes for your home?

How do you transplant a grown tomato plant?
If you've never transplanted tomatoes before, the idea can be intimidating. You have all these tiny plants that you've cared for over the last several weeks, and now it's time to pluck them out of their nursery pots and plop them into the outside soil where they're exposed to sun, weather, and critters. Luckily, you've cared for them so well that they're healthy and robust plants that will be able to handle anything nature throws at them.
Step one: Harden the plants
Hardening the plants is a term gardeners use when talking about the process of acclimating a greenhouse-grown plant to outside conditions. Typically it refers to sunlight, but it could also refer to wind and other weather that could harm the plant. About a week before you're ready to transplant, you'll want to harden your baby tomato plants by exposing them to sunlight at increasing increments each day. For example, day one should be about 30 minutes, then 45, then 50, and so on until the day of transplanting. If you don't do this, you'll risk your plant being burnt and killed when you transplant it outside.
Step two: Don't water the plants
Before you start pulling little plants out of their pots, you mustn't water the plants a few days before transplanting. Wet soil can make the transplanting process much harder on you and the plant. Dry soil falls away easier and is less likely to break off roots as you move the plants to their new home.
Step three: Prepare the new soil
The new location for your tomato plants will need to be prepped before you get all those babies out of their homes. Whether you are planting into the ground, a raised bed, or a pot, you'll want to amend the soil to guarantee that the plant has many nutrients to soak up. It also is easier if you dampen the soil right before transplanting. Damp soil is much more manageable and more easily manipulated around the plant.
Step four: Plant deeply
As you gently pull out the baby tomato plants, you'll want to shake off the old soil to expose the roots. This will ensure the plant has access to the new soil and nutrients you're about to provide it with. 

Read more
5 outdoor living trends that will totally improve your 2022
women outside sitting

After being stuck in our homes the last two years, we've started to realize that making our homes into a lovely place to be is very important. However, we can only stay inside for so long before we ache for sunshine and nature. Turning your outdoor space into a haven where you can escape the indoors and enjoy some fresh air will improve your 2022 no matter what it throws at us. So here are some ways to spruce up your outdoor living space so you can enjoy the spring when it finally comes back around.

Bring indoor luxuries to an outdoor space
The best way to encourage yourself to go outside more often is to make it as comfortable as possible. So often, we choose indoor seating instead of going outside simply because that huge sectional is way more comfortable to lounge on. So instead, invest in comfortable seating, plenty of surfaces for drinks and electronics, and maybe even purchase some umbrellas or awnings so you can sit outside even if it's lightly raining. Making an easy transition from indoors to outdoors will encourage everyone in the home to come out more often and enjoy the space.
Vertical gardening
Not everyone has the luxury of having an expansive backyard. If you're struggling to know what to do with your smaller space, but you know you want more plants and gardening opportunities, try vertical gardening! This is where you take a wall of your deck or fence and grow plants one on top of the other. You might have seen these as living walls or those DIY projects with pallets and herbs. Either way, growing flowers or veggies vertically allows you to garden without taking up precious space in your smaller yard.
Outdoor office
Many of us spend a lot of time inside at our desks. If you were lucky enough to work from home the last few years, you might have a pretty decent setup for your home office. However, spending all day inside when the weather is excellent can be depressing, and if you're home, why not take advantage of the opportunity and create an outdoor office space? This allows you to keep working while enjoying the sunshine and fresh air. Endless studies are proving that getting outside more often improves mental and physical health!

Read more
Good, better, best: The perfect gas grill for your outdoor kitchen
best outdoor gas grill woman grilling outside

Grills these days do a lot more than cook Independence Day hot dogs. Viewed as a more flavorful and healthful alternative to some other, more conventional cooking methods, grilling is the centerpiece of many a culinary adventure, from the everyday to the downright fancy.

Does any of that sound appealing? You may be ready to make a long-term investment in a heavy-duty gas grill. A solid gas grill is easy and economical to use, stands up to wear and tear over time, is fairly simple to use and maintain, and can provide the kind of flexibility and functionality you need in an everyday cooking space.

Read more